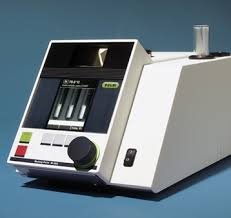
Validation and Calibration of Melting Point Instruments.

Validation and Calibration of Melting Point Instruments
Introduction
The melting point of a substance is a critical physical property used to identify and characterize chemicals, particularly in the pharmaceutical and chemical industries. For accurate and reproducible results, the melting point instrument used to measure this property must be properly calibrated and validated. Validation ensures that the instrument performs as expected under normal operating conditions, while calibration ensures that the instrument is providing accurate results in relation to a known standard.
1. What is Calibration?
Calibration is the process of adjusting and verifying an instrument’s measurements against a known standard to ensure that it is operating correctly. In the case of a melting point apparatus, calibration involves checking the instrument’s readings against substances with known melting points to confirm its accuracy.
2. What is Validation?
Validation ensures that the melting point apparatus consistently produces accurate results when used in normal operating conditions. This involves a series of tests and checks to confirm that the instrument works as expected, across a range of temperatures and operating conditions.
3. Steps in the Calibration Process
To calibrate a melting point apparatus, the following steps are typically involved:
a. Select Reference Standards
-
Choose substances with well-documented, precise melting points. These reference materials should span the range of melting points expected in the samples you will be testing. Common examples include:
-
Acetanilide (melting point: 114°C)
-
Caffeine (melting point: 238°C)
-
Benzoic acid (melting point: 122°C)
-
Salicylic acid (melting point: 159°C)
-
-
Ensure the purity of these substances, as impurities can affect the accuracy of melting point readings.
b. Perform Calibration Tests
-
Set the apparatus to the desired heating rate (commonly between 1°C and 10°C per minute).
-
Place a small amount of the reference material into the melting point apparatus and gradually increase the temperature.
-
Record the temperature at which the substance begins to melt and when it is completely melted.
-
Compare the observed melting points with the known values of the reference material.
c. Adjust Instrumentation
-
If the observed melting points are consistently higher or lower than the known values, adjust the instrument settings. Many modern instruments allow for adjustment or compensation of temperature readings.
-
If no adjustment is possible, recalibration or servicing of the instrument may be necessary.
d. Repeat for Multiple Standards
-
To ensure accuracy across a range of temperatures, repeat the calibration with multiple reference materials with different melting points.
-
If necessary, test the apparatus over several days to ensure stability and consistency.
e. Record Calibration Data
-
Document the calibration procedure, including the temperature readings, reference materials used, and any adjustments made to the instrument.
4. Validation Process
Once the instrument is calibrated, it must be validated to confirm that it performs well under real-world operating conditions. The validation process typically involves the following:
a. Operational Qualification (OQ)
-
This step verifies that the instrument functions as expected under normal conditions, including correct operation of the heating and cooling mechanisms and the accurate recording of temperatures.
-
Ensure that all features of the melting point apparatus (e.g., temperature control, sample holder, viewing window, etc.) work properly.
b. Performance Qualification (PQ)
-
Conduct a series of melting point tests on samples with known melting points to check for reproducibility and consistency.
-
For example, measure the melting points of acetanilide or caffeine at least three times under identical conditions, noting any variations.
-
The test results should fall within an acceptable range (usually within ±1-2°C of the reference value).
c. Verification of Precision
-
To validate precision, the instrument must be able to reproduce the same result when measuring the same sample multiple times.
-
Measure a sample multiple times (e.g., 3-5 trials) and check that the results do not vary beyond a specified range (e.g., within ±1°C).
d. Routine Checks
-
Over time, continue to verify that the instrument maintains its calibration and validation standards.
-
Conduct periodic checks using reference standards to ensure that the apparatus still meets the required accuracy.
5. Documentation and Record-Keeping
Both calibration and validation processes must be carefully documented. Proper documentation ensures that the instrument is functioning as expected and can be verified by internal or external auditors. The documentation should include:
-
Calibration date and technician details
-
Reference materials used and their known melting points
-
Instrument adjustments made (if any)
-
Results of validation tests, including precision and reproducibility data
-
Corrective actions taken (if applicable)
6. Maintaining Calibration and Validation
To maintain accurate results, regular maintenance, calibration, and validation must be performed:
-
Routine Calibration: Recalibrate the instrument after any significant repairs, changes to environmental conditions, or at regular intervals (e.g., annually or biannually).
-
Environmental Factors: Consider the impact of environmental factors such as ambient temperature, humidity, and vibration on the instrument’s performance.
-
Software Updates: Ensure that any software controlling the melting point apparatus is up-to-date and functioning correctly.
7. Troubleshooting
If discrepancies arise during calibration or validation, some common troubleshooting steps include:
-
Check for dirt or contamination in the sample holder or other parts of the apparatus.
-
Verify the heating rate: If it’s too fast, melting point results may be inconsistent.
-
Inspect the temperature sensor: A malfunctioning sensor can lead to inaccurate readings.
-
Ensure the instrument is level: An uneven instrument setup can cause inaccurate temperature readings.
Conclusion
Validating and calibrating a melting point apparatus is essential for ensuring that accurate and reliable data is obtained from the instrument. Regular calibration using reference materials and consistent validation will help maintain high precision and avoid errors in measurements, which is particularly important in fields such as pharmaceuticals and chemical analysis. By following a systematic process of calibration and validation, users can ensure their melting point apparatus provides consistent and accurate results over time.
🎓 Discover one of the best Quality Assurance courses available — click below to explore the course that’s shaping future QA skills.

