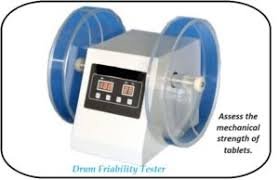
Methodology for Calibrating a Tablet Friability Tester.

Methodology for Calibrating a Tablet Friability Tester
The friability test is crucial in the pharmaceutical industry for assessing the durability and mechanical strength of tablets. A friability tester is used to evaluate how well tablets withstand mechanical stress during handling, packaging, and transportation. To ensure the test’s accuracy and reliability, regular calibration of the friability tester is essential. Below is a detailed methodology for calibrating a tablet friability tester:
1. Introduction to Friability Testing
Friability refers to the tendency of tablets to break, chip, or crumble under stress. A friability tester measures this property by subjecting tablets to a specific amount of mechanical impact. The standard test involves placing a sample of tablets in the drum of the tester and rotating the drum at a fixed speed for a designated time or number of revolutions.
2. Essential Calibration Requirements
Calibration ensures the friability tester provides consistent and accurate results. The following are key parameters that require calibration:
-
Rotational Speed: Ensures that the drum of the friability tester rotates at the correct RPM (revolutions per minute).
-
Drum Dimensions: The size of the drum must meet the specifications to ensure that tablets move in a consistent, repeatable manner.
-
Impact Force: The force of impact exerted on the tablets during rotation should be controlled and reproducible.
-
Duration: The time or number of rotations for the friability test must be accurate.
3. Pre-calibration Preparations
Before starting the calibration process, ensure the following:
-
Clean the Equipment: Remove any dust, tablet residue, or debris from the friability tester.
-
Check the Power Source: Ensure the machine is plugged in and is receiving proper electrical power to operate.
-
Visual Inspection: Inspect the drum, motor, and other components for wear and tear, as these can affect test results.
4. Calibration Procedure
Step 1: Check the Rotational Speed
-
Equipment Needed: A calibrated tachometer or RPM sensor.
-
Procedure:
-
Place the tachometer near the rotating drum.
-
Turn on the friability tester and allow it to rotate at the prescribed speed (usually 25 RPM for 4 minutes).
-
Record the measured RPM on the tachometer and compare it to the manufacturer’s specification.
-
If the reading deviates, adjust the motor or controller settings to correct the speed.
-
Step 2: Verify Drum Dimensions
-
Equipment Needed: Caliper or measuring tape.
-
Procedure:
-
Measure the internal diameter and height of the drum to ensure they conform to the required dimensions (usually 10 cm in diameter and 12 cm in height).
-
If the drum is out of specification, replace or adjust the drum to meet the specifications.
-
Step 3: Confirm the Impact Force
-
Equipment Needed: Impact testing device or force gauge.
-
Procedure:
-
Load a set number of tablets into the drum (typically 20 tablets).
-
Run the friability tester and measure the impact force applied to the tablets during rotation using the impact testing device.
-
Ensure the impact force falls within the acceptable range as specified by the standard (e.g., force must not exceed a certain value to prevent excessive breakage).
-
Adjust the tester’s internal mechanism if the force is outside the acceptable range.
-
Step 4: Check Rotation Time or Number of Revolutions
-
Procedure:
-
Set the friability tester to the standard time (usually 4 minutes) or a set number of rotations (100 revolutions).
-
Using a stopwatch or a digital timer, verify that the tester runs for the correct duration.
-
If necessary, adjust the timer or internal settings to match the correct duration.
-
Step 5: Recalibrate Weighing Scale (if applicable)
-
Equipment Needed: Calibrated analytical balance.
-
Procedure:
-
Weigh the sample of tablets before and after testing to calculate the percentage loss in weight.
-
Use a calibrated balance to ensure accurate weight measurements.
-
Perform a zeroing check on the balance and ensure it is not affected by vibrations or drafts.
-
5. Post-calibration Checks
Once the calibration steps have been completed, verify the overall performance of the friability tester by running a dummy test:
-
Select a batch of tablets with known properties.
-
Perform the friability test according to the standard procedure.
-
Measure the percentage weight loss after the test.
-
Compare the results with previous tests to ensure consistency.
6. Documentation
It is essential to document all calibration steps and results for compliance with regulatory standards (such as cGMP, ISO, or FDA regulations). The documentation should include:
-
Calibration date and time.
-
Equipment details (model, serial number, etc.).
-
Calibration results and adjustments made.
-
The identity of the person performing the calibration.
-
Next scheduled calibration date.
7. Maintenance and Recalibration Schedule
Regular calibration ensures that the friability tester maintains accuracy over time. The following guidelines should be followed for recalibration:
-
Frequency: Calibration should be performed at regular intervals (e.g., monthly, quarterly) or after any repair or maintenance work.
-
Condition-based Calibration: If there is an issue with the friability test results (e.g., unexpected variations in tablet weight loss), recalibration should be done immediately.
8. Conclusion
Calibration of the friability tester is an essential part of ensuring the quality and reliability of tablet testing. A properly calibrated tester guarantees consistent and reproducible results, helping to ensure that tablets meet the required durability standards. By following the methodology outlined above, pharmaceutical manufacturers can maintain the accuracy and performance of their friability testing apparatus.
🎓 Discover one of the best Quality Assurance courses available — click below to explore the course that’s shaping future QA skills.

