Sop On Gram Staining Procedure

- Purpose
This SOP describes the procedure for performing the Gram staining technique, which is used to differentiate and identify gram-positive and gram-negative bacteria based on their cell wall characteristics.
- Scope
This procedure applies to all microbiological testing personnel performing Gram staining in the microbiology laboratory.
- Responsibilities
4.1 All microbiologists must strictly follow this procedure
4.2 The Head of Department is responsible for ensuring compliance with this SOP
- Materials Needed
4.1 Glass slides: Clean, grease-free microscope slides for preparing bacterial smears.
4.2 Bunsen burner: For heat-fixing the bacterial smears onto the slides.
4.3 Staining tray: For holding and staining the slides with the required reagents.
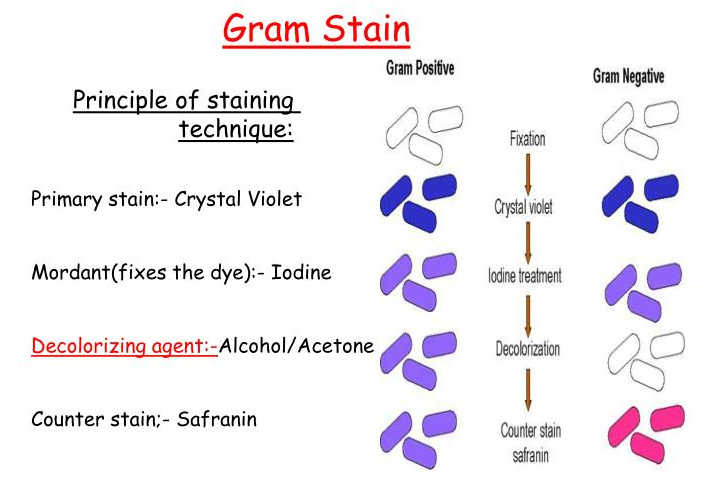
4.4 Gram’s crystal violet solution: The primary stain used in the Gram staining process.
4.5 Gram’s iodine solution: A mordant that binds with the crystal violet stain, forming an insoluble complex within the cell walls of gram-positive bacteria.
4.6 Decolorizing solution: A solution containing alcohol or acetone used to decolorize or remove the crystal violet-iodine complex from gram-negative bacteria.
4.7 Gram’s safranin solution: The counterstain used to stain gram-negative bacteria.
4.8 Blotting paper: For gently blotting and drying the stained slides.
4.9 Microscope slides and coverslips: For mounting and examining the stained smears under a microscope.
4.10 Immersion oil: For use with the oil immersion objective of the microscope.
- Procedure
5.1 Prepare the smear
5.1.1 Clean a glass slide to remove any grease, oil, or contaminants that may interfere with the staining process.
5.1.2 Using a sterile loop, transfer a small sample of the bacterial culture onto the clean slide, and spread it in a thin, even smear.
5.1.3 Allow the smear to air dry completely to ensure proper adherence of the bacterial cells to the slide surface.
5.1.4 Heat fix the smear by passing the slide through a Bunsen burner flame 2-3 times, with the smear side facing up. This step helps to adhere the cells firmly to the slide and prevents them from being washed away during the subsequent staining steps.
5.2 Stain with crystal violet
5.2.1 Place the slide on a staining tray, with the smear side facing up.
5.2.2 Add enough crystal violet stain to cover the entire smear surface. The crystal violet acts as the primary stain and will initially stain both gram-positive and gram-negative bacteria.
5.2.3 Allow the stain to remain on the smear for 1 minute to ensure proper penetration and binding.
5.2.4 Rinse the slide gently with water to remove any excess stain that has not been taken up by the bacterial cells.
5.3 Add iodine solution
5.3.1 Cover the smear with Gram’s iodine solution, which acts as a mordant (binding agent) and forms an insoluble complex with the crystal violet stain within the cell walls of gram-positive bacteria.
5.3.2 Allow the iodine solution to remain on the smear for 1 minute to ensure complete reaction with the crystal violet stain.
5.3.3 Rinse the slide gently with water to remove any excess iodine solution.
5.4 Decolorize
5.4.1 Tilt the slide and add the decolorizing solution (alcohol or acetone) drop-wise onto the smear. The decolorizing solution will remove the crystal violet-iodine complex from the gram-negative bacteria, leaving them unstained.
5.4.2 Continue adding the decolorizing solution drop-wise until no more color appears to be coming from the smear, indicating that the gram-negative bacteria have been decolorized.
5.4.3 Rinse the slide immediately with water to stop the decolorization process and prevent over-decolorization of the gram-positive bacteria.
5.5 Counterstain
5.5.1 Cover the smear with Gram’s safranin solution, which acts as a counterstain and will stain the decolorized gram-negative bacteria pink or red.
5.5.2 Allow the safranin counterstain to remain on the smear for 45-60 seconds to ensure proper staining of the gram-negative bacteria.
5.5.3 Rinse the slide gently with water to remove any excess counterstain.
5.6 Dry the slide
5.6.1 Blot the slide gently with blotting paper or allow it to air dry completely before proceeding to the microscopic examination.
5.7 Observe under the microscope
5.7.1 Place a drop of immersion oil on the stained smear and carefully lower the microscope’s oil immersion objective (typically 100X magnification) onto the oil droplet.
5.7.2 Observe the stained smear under the oil immersion objective, adjusting the focus and light as needed.
5.7.3 Gram-positive bacteria will appear purple or blue in color due to the retention of the crystal violet-iodine complex within their cell walls.
5.7.4 Gram-negative bacteria will appear pink or red in color due to the counterstaining with safranin after the decolorization step.
5.8 Precautions
5.8.1 Always handle bacterial cultures and stains with care, following appropriate biosafety protocols and wearing personal protective equipment (PPE) such as lab coats, gloves, and safety glasses.
5.8.2 Discard used stains, decolorizing solutions, and other contaminated materials according to proper biohazardous waste disposal procedures.
5.8.3 Keep the staining tray jars clean and replace the staining reagents when they become too diluted, contaminated, or discolored.
5.8.4 Perform quality control checks regularly by staining known gram-positive and gram-negative control strains to ensure the proper performance of the staining reagents and procedure.
5.8.5 Document all staining procedures, observations, and results in the designated laboratory notebook or worksheet, maintaining proper record-keeping for traceability and review.
- Author: Bhavana Tatineni
- Qualification: MSc Microbiology

